Sunday, July 21, 2013

Rewards of organic gardening in our back yard (21st July 2013)

21st July 2013, status of our organic farming experiment
Kale: So by now we have started getting vegetables for cooking from our back yard garden, the most productive has been Kale, very easy to grow, no bug problem and very fast growth rate. We bought 4 of these kale plants in one pot from Walmart and planted in one patio picker box and watered regularly. It has been one of the healthiest plant in our garden. 

Our Kale plant growing in a planter box.
Roma Tomato plant, one tomato starting to turn red now.
Tomatoes: We have 4 plants of Roma tomatoes, one hybrid tomato and two plants of cherry tomatoes, all in containers. They are extremely productive, there are around 50 tomatoes altogether between the 4 Roma tomatoes and one hybrid tomato plant, number of cherry tomatoes between two plants is probably 30-40. It takes a while for the tomatoes to become ripe and turn to red color, now we have our first two Roma tomatoes turning red. We have not had any bug problems with our tomato plants. They need a lot of space to grow. One helpful thing we did was build a cage around the tomato plants initially to support them and protect them during heavy winds of pacific northwest, later when the plants started giving tomatoes, the plant intelligently started using the cage for support and often it was seen the plant branches without support drops down due to the weight of the tomatoes. We kept adding more and more fence around the tomato plants so that they can get support. The plants grew through the fence, enforcing the supporting structure.The fence we used was a cheap wire 

fence for garden that was bent and connected to each other, so we improvised in this manner because our rectangular pots were not ideal for a circular tomato cage.
Roma Tomatoes another tomato that is almost red already among some 40 which are still green.
Cherry Tomatoes
Cherry Tomatoes, they grow very well with no bug problems
Hot pepper that grows very well, not much hot actually though
Chilly: We have one jalapeno plant, one hot green pepper plant, one capsicum plant and one thai pepper plant in the containers in our garden. Initially for some time they were flowering and the flowers became dry and fell off, then in few weeks new flowers came which started turning into pretty big chilies. They grew pretty fast. The capsicum plant didn't have issue of flowers wilting, the first two flowers itself turned into capsicum. We have already harvested a few hot peppers and a few jalapenos from our garden for cooking. Jalapenos were spicy, hot peppers were surprisingly not at all spicy, the hot thai pepper started giving chilies recently, we are hoping that it will stand up to our "hot" expectations. We didn't have any bug problem with our chilies either. 

Hot pepper almost grown to full size.

Hot Thai Pepper, about 7 of them have started growing now, these are expected to be really hot. 
Jalapenos, reasonably hotter than what we get in market.
Egg plant (Brinjal): We have only two egg plants in our garden. One is a black beauty egg plant that grows to the fat, big egg plants and a japanese egg plant that makes these long thin egg plants. Both of them were very slow during growth and also the flowers were drying and falling of for several weeks, now since last few weeks we have started seeing many egg plants in the japanese egg plant, almost 7 of them are growing now and have reached almost 4 inches or so in length. In the black beauty egg plant two of them have started growing. One is about two inches long. Both of them are dark violet in color. 

Black beauty egg plant, the big fat egg plants.
Japanese egg plant in its early stage of growth. They grow into long thinner egg plants.
Japanese egg plant as it is now, the long one is the exact same one as above but grown up to almost 6 inches long. 
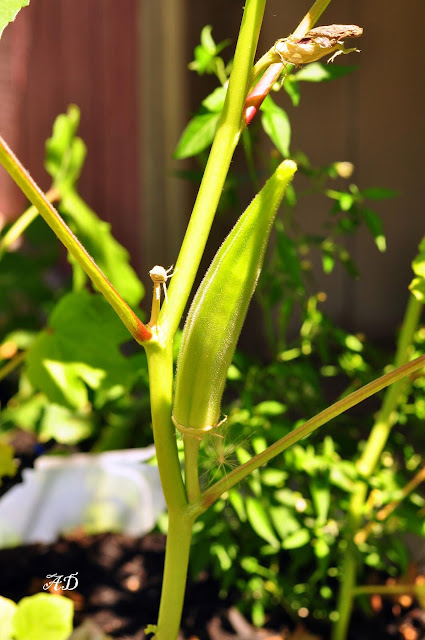
Okra: Due to the way we planted the okra plants, it turned into an interesting experiment. We have some 10 okra plants, it happened so that we have 4 of them in one planter which gets good amount of sunlight, another 4 in another planter with less amount of soil depth but good amount of sun, and another 4 in a planter in the shaded area. The best growth was seen in the plants with adequate sunshine and soil depth, then the ones with adequate sunshine but lesser soil, and the smallest ones were the ones in shaded area. We have got our first okra now.
Okra starting to grow

Our first full grown okra
Green Beans: Green beans were very easy to grow, all our beans plants were grown from seeds. They started flowering quiet early and already we have harvested them a couple of times.
Green beans, has been growing very well and already gave a lot of beans which we cooked and ate multiple times.
Zucchini: We bought 3 zucchini plants and planted them in one big planter. They grew very fast, now we have about 6 zucchinis growing slowly.
Zucchini plant with numerous green zucchinis all around the plant. 

Thursday, June 20, 2013

Insect/pest control

Here are a few handy tips to save your plants from insects and pests.
Our spinach plants were suddenly getting yellow and drying off. Many of the green ones had holes in them, as if being eaten by some bug.
We found out that most probably its a Leaf Miner attack! Leaf miner is a fly like insect which drops its eggs on plant leaves. From these eggs come larvae which feed on our plants. Plants like spinach are very prone to such insects.
We did not want to buy harmful pesticides from market which even though many claim to be organic, harmless, result guaranteeing, etc.
So these are the steps we took to save our spinach plants:
1. Pinch off all the infected leaves. Even if there seems to be little white specs on the leaves, they need to be removed.
In the initial stage, if you see just the white specs, you can brush them off with hands and let the leaf stay
However if you realize this late, its best to abandon all infected leaves.
2. Do not drop pinched off leaves close to the ground as it may still contain larvae and they might breed in your soil. Trash them.
3. Use a natural insecticide. I found garlic spray very effective.
Steps to make Garlic spray:
- Add about 3 tablespoons of chopped garlic (or about 2 bulbs) to 1 cup hot water and let it stay over night.
- Next day, strain the liquid.
- You can add additional components like crushed pepper, liquid dishwasher soap, vegetable oil to the liquid and spray to your garden.
You can use this as a natural insecticide for many plants in your garden.
Make sure you store the remaining spray in your refrigerator as it tends to go bad like any other food item.

This seems to be working for me. My plants are coming back to life after losing many of their leaves. Though the progress is slow, there are no more dried or infected leaves in my plant.

Do share if you have more natural insect/pest control remedy.
Happy Gardenig! 

Sunday, June 16, 2013

Initial results of organic farming : 16th June 2013

We planted 4 Roma tomato plants, 1 disease resistant hybrid tomato plant, one cherry tomato plant and we grew one  tomato plant grown from seed. All the plants except cherry tomato were planted by about April end. Now in one and a half months all the tomato plants grew to almost 1 and half feet tall. So as they grew we had to replant them in bigger containers to give them more space to grow as well as provide support in the form of a small fence around the planter to protect the plants from wind. So we still enjoy watching them grow taller and taller and a few weeks ago they already started giving flowers, beautiful yellow flowers in all the tomato plants. And once the flower forms in a few weeks each of them transforms to a little tomato.  

We already have about 10-15 tomatos at different stages of growth in our 5 tomato plants. The plant that grew from seed is in the fast growth stage. 


So as these grows up and get ripe enough to pluck i am assuming that they will turn color to red. From the look of it, in a few weeks from now we will have about 10 tomato's ready to be plucked. And there is a great satisfaction in knowing that we havnt put any fertilizer for getting crazy productivity from these and is perfectly organic. I can only wonder how much chemicals end up in our body, when i see rows of chemical fertilizers in stores promising 10 times more productivity if you put those chemicals in your vegetable farm. For a farmer who is trying to make profit i would assume those chemical fertilizers will be very attractive and they will use it without thinking how that will impact the soil or those who eat the vegetables grown from their farm. 
The cherry tomato plant was planted about 3 weeks before along with a greek basil plant and already it started flowering and some flowers have already started transforming into cherry tomatos.  

So if you read this blog untill now and is finding this interesting and need some directions for starting up a little veggie garden in your back patio, drop us an email and we will be delighted to give some pointers from our experience. 


Sunday, May 26, 2013

recycled milk cans for organic herb garden

Rather than throwing away all the milk cans that you purchase to the weekly waste and filling up the landfills, they can be used as planters for growing a herb garden in you patio. 
These recycled cans are especially great for growing cilantro and mint plants. Also it is a solution for the problem of storage of the mint and cilantro bunch we buy during weekly shopping that tend to go bad by end of week. By having your own live plants you can pluck cilantro on an as needed basis and use it for cooking. 

The procedure is quiet simple. Take an empty milk can, wash it well and the cut it as given in the figure. The handle provides a good structure to hold the planter as well as in hanging them in your patio. 
So in my garden i recently planted three cilantro plants and one mint plant in three of these recycled milk can containers. They are hanging on one corner of the patio facing sun. After you cut the can fill the can to almost the top brim by organic potting soil with some composite mix. I have used different organic potting soils from multiple different companies. All of them work just fine. Then take the cilantro plants and mint plants you wish to plant and carefully plant them in the soil. The cans should be kept in places with adequate sun light. In our garden we hung them up on a corner in cluster of three pots. I have enough room below so that i can hang more cans in future. When you hang the cans make sure you run the cord used for hanging, through the handles. This sort of hanging helps to get a sturdy hold on the cans. We have also tied it to the pole in our patio.
Also make a few little holes in the bottom of the containers for drainage and water the plants on a daily basis and watch it growing. If you do this next time when you need some cilantro or mint, no need to drive to the market; just walk to your patio and pluck some fresh leaves for cooking right out of your herb garden. Besides getting super fresh organic herbs, its a lot of enjoyment watching them grow. We have also read that cilantro replants itself and thus comes up year after year by itself or you can make multiple plants from the one plant you have planted. This we will monitor for this year and will write another blog on the replanting of these plants. All these recycling really permits reducing harmful pile up of plastic in ocean and dumping grounds polluting our mother earth. Wish you all the best for your gardening adventure. Feel free to share your
opinion below as comments.


You can color your cans and they make your garden more lively and nobody will guess it all started with a milk can! I used spray paints here. You can add your own ideas and share them.

Make your own self watering planter for 1/3rd the cost of citypickers planters

Organic vegetable gardening in your patio can be done with much less money if you are determined to find ways to do it. So having self watering planters is good since even if you miss watering your plants for a day or so, the plants still survive and doesn't wilt off. However most of the self watering planters are more than 30$. So i bought a few of them to start off my farming and now i realized that i can possibly make something very similar with 1/3rd the cost of a commercially available planter. So this blog is about that attempt and sharing my experience with those of you out there who are also looking for cheaper alternatives to effective vegetable farming in your back yard or patio.
So the things you need are one good laundry bin or closet organization bin with its lid, a few rocks, a long aluminum beverage can and the soil in which you plan to plant your plants. The laundry bin can be brought from walmart for 8$. First cut the edges of the lid off so that you can lover the lid to the bottom of the bin. Then make a number of holes on the lid. Using a heated kitchen knife will make it easy. Then use a can opener and take off the top and bottom portion of the beverage can so that it appears more like a pipe. If you have a PVC pipe piece lying around in your home, you can even make use of it instead of an aluminium can. Then spread the rocks in the bottom of the laundry basket, keep the beverage can tube in a corner of the basket and then lower the lid on top of the rocks. Once the lid is all the way down spread soil specially along the outside as well as along the corners. Then water it down and spread soil evenly on top the lid all the way to the top of the basket. Mixing some compost with the soil will help in plant growth. Once you fill up the soil you can pour water from top as well as through the tube. Also make two holes on the sides of the container at about 1 inch height from bottom for overflow in case you pore too much water. So the water will stay in the region between the rocks and the porous lid acting as a reservoir. Also the roots of the plants can grow through the pores to reach water. This way even if you forget to pour water for a day plants can get the essential water from the reservoir below. The photo given here also explains the basic idea.
I will share a picture of the planter after i planted some vegetable plants soon as well as post the updates on its growth also here in the coming weeks. Wish you a happy farming.
 

Organic strawberry planting

Go and buy a hanging strawberry plant and take care of it at home, i am sure in a period of few months you will more than compensate for the money you put in since you will constantly get a good number of tasty organic strawberries straight from your patio. Wish you a happy gardening. , following which we noticed so many new flowers and strawberries coming up in our plant. We harvested our first ripen strawberries two weeks ago. We got 3 really tasty strawberries in our first harvest. Then that number went up to 4 new strawberries this last week. This week also it looks like about 4-5 strawberries are on its way to be suitable for plucking. Apart from really getting strawberries off of your plant that you can eat, its a pleasure to take care of the plant and see it growing. The beauty of these red strawberries growing on the plants itself is such a relaxing site to our eyes. So our suggestion to all those who are interested in gardening: Go and buy a hanging strawberry plant and take care of it at home, i am sure in a period of few months you will more than compensate for the money you put in since you will constantly get a good number of tasty organic strawberries straight from your patio. Wish you a happy gardening.